Top 10 Travel Tips for your first time in Amsterdam, Netherlands

  • 1. Stay in De Pijp – Staying at the Sir Albert, of course! De Pijp is a down-to-earth neighborhood that is easy to stroll and not quite as noisy as the city center. It is filled with lovely restaurants and has great streets and canals to meander. It’s also a 20-30 minute walk to the city center and red light district or a quick metro ride!
  • 3. Visit the Tony’s Chocolonley HeadquartersTony’s Chocolonley is a Dutch chocolate company that was created to combat the exploitation in the cocoa manufacturing industry. Not only is its mission important, its chocolate is amazing. Conveniently, its headquarters are based in the heart of Amsterdam. The company has creative flavors, bars, and snacks to choose from. But if nothing on the menu tickles your fancy, then you can actually make your own chocolate bar – amazing, right?!
Blueberry Deluxe with a scoop of saffron ice cream. Heavenly.
  • 6. Try bitterballen. If croquettes and beef stew had a child, it would be a fried baby bitterballen. You simply cannot leave Amsterdam without trying one. We ordered them at cafe t’Smalle, and they were so delicious!
  • 7. Check out a museum – We opted for the Van Gogh museum. You can purchase tickets ahead through the museum’s website. If you prefer to enter through a guided tour, you can purchase tickets and the tour here. While we didn’t do a tour this time, I recommend booking your tickets ahead of time for the day and time slot you want to go. I would set aside a minimum of two hours for the Van Gogh museum. If you’re short on time, the Kattenkabinet (cat museum) is quirky and cool with a lovely gift shop! It only takes 45 minutes to an hour to explore.
  • 8. Enjoy a cocktail date night – The Flying Dutchman was a perfect date spot, but be sure to make reservations! It had an inspiring menu showcasing classic cocktails throughout the ages and a robust whisky collection.

Til next time

❤ Natalie

(This post contains affiliate links and we will be compensated if you make a purchase after clicking through our links.)

Healthy & Easy Lemon Lavender Shortbread Cookies Using the Cutest Squirrel Cookie Cutter

by Myles Katherine

(As an Amazon affiliate, I earn from qualifying purchases.)

lemon lavender shortbread cookies

I picked up some culinary lavender from the farmer’s market on Saturday and couldn’t wait to use it in a recipe. I’ve actually never cooked with lavender since my husband thinks it’s too “flowery”. But I did catch him sneaking a few bites of the dough so he must not hate it that much!

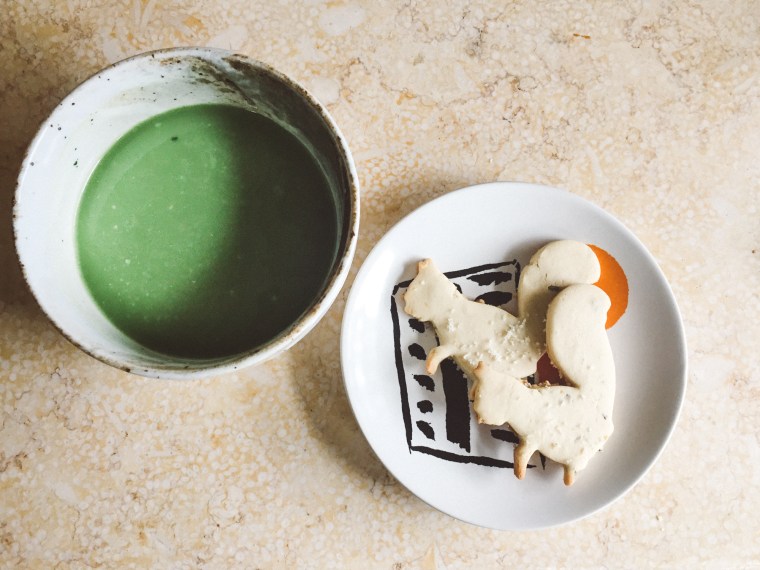
These cookies were perfect for a breezy Sunday. I’ve also recently gotten into drinking matcha tea instead of coffee, and the cookies were a perfect treat to have on the side. The only downside is that I couldn’t stop eating them! But I made myself feel better by reminding myself that lavender is supposed to lessen anxiety and help calm the nervous system.

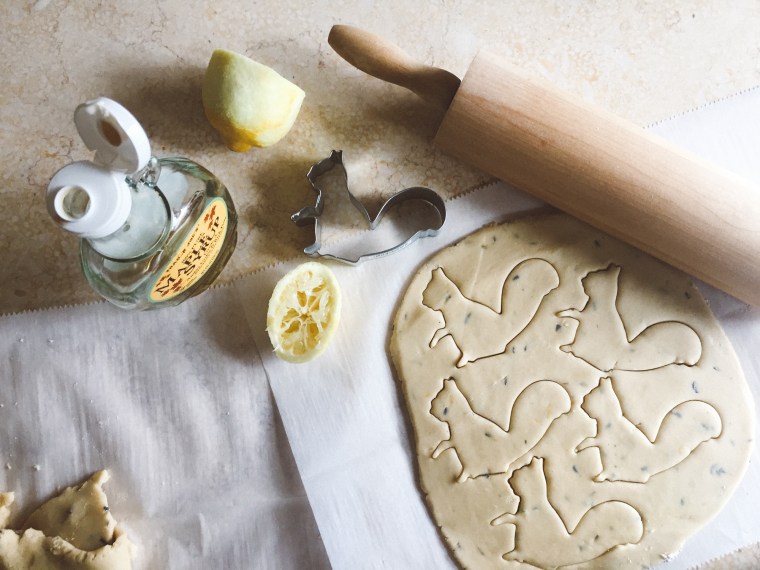
I was also looking for a recipe that didn’t include granulated sugar, and the maple syrup adds a lovely flavor to the cookies. You can pick up an adorable squirrel cookie cutter here!

INGREDIENTS

  • ½ cup butter, at room temperature OR coconut oil, softened
  • ½ cup maple syrup {or liquid sweetener of your choice}
  • ½ tsp pure vanilla extract
  • 1 tsp fresh squeezed lemon juice
  • dash of salt – I used a Sea Salt and Lemon blend
  • 2¼ cups flour (I used a combination of millet flour – for a more powdery texture – and unbleached all purpose flour)
  • zest of 1 lemon
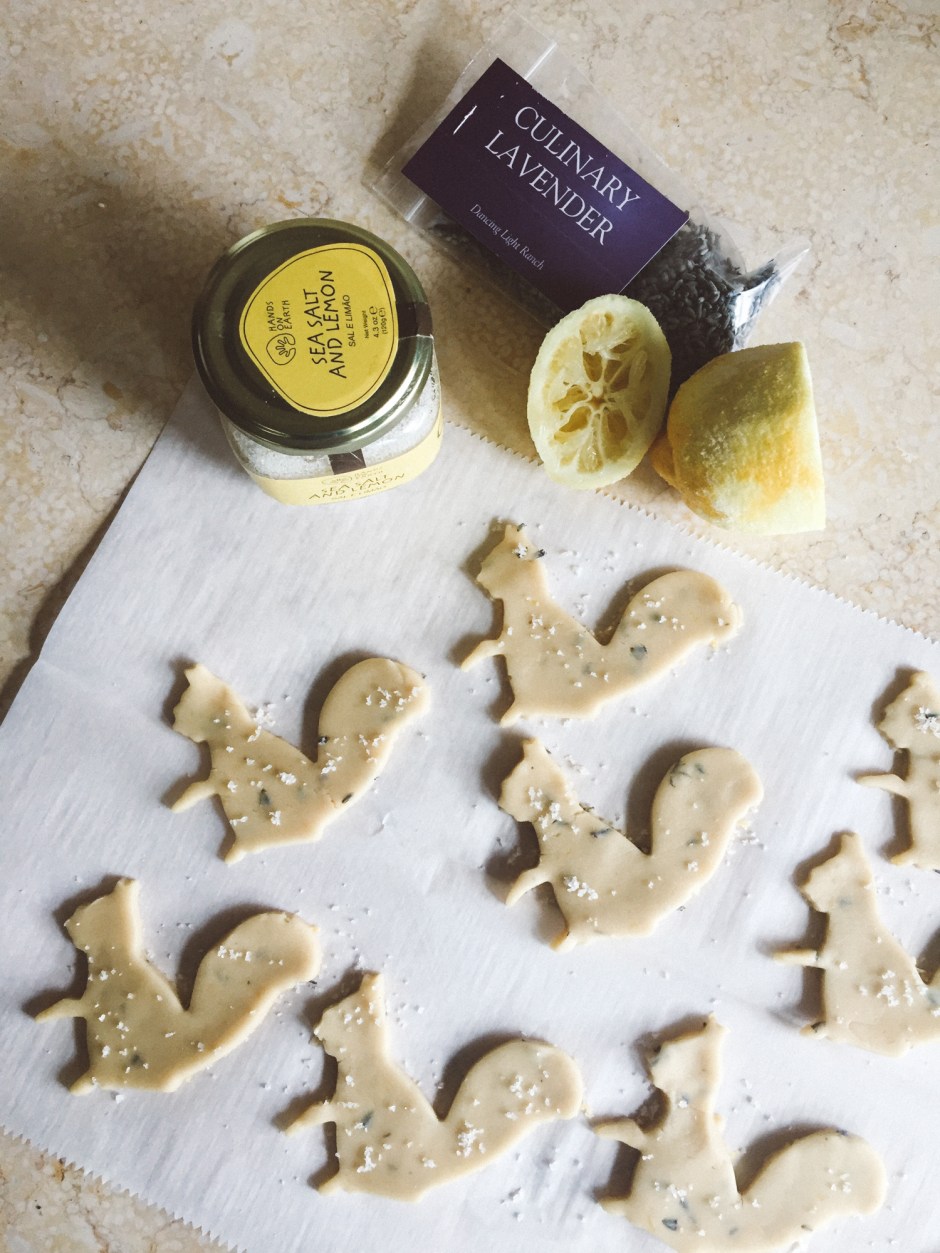
  • 1/2 to 1 tbsp culinary lavender (depending on how flowery you’d like your cookies – I used a whole tbsp!) – I got mine from Dancing Light Ranch

INSTRUCTIONS

  1. Preheat oven to 350F. Line 2 cookie sheets with parchment paper. Prepare a rolling area with two additional sheets of parchment paper for that, and have your cookie cutter(s) handy.
  2. Place butter in a large mixing bowl and whip it with a mixer until it’s creamy. Add sweetener, vanilla extract, lemon juice and salt and mix once again to combine. Add in flour, lemon zest, and lavender (I used a mortar and pestle to grind the lavender first to bring out the flavor), and use a wooden spoon to mix. Then get in there with your hands and mix everything together by working the dough until you can shape it into a ball {note: as depending on the flour mix you use there may be a slight variance, know that the consistency of the dough should not be sticky but should press together when pinched — be sure to knead it really well first for some time — if it’s a little sticky, add a little more flour (try 1-2 tbsp); if it’s a little dry add a little more sweetener (try 1 tbsp)}. Shape the dough into 2 balls and then flatten each into a disk.
  3. Roll out one of the dough balls between two sheets of parchment paper to ⅓” – ½” thickness. Use a cookie cutter to cut out the cookies. Carefully transfer to a prepared cookie sheets, spacing them ½” apart {they won’t spread as they bake}. Gather up any dough scraps and repeat until all dough is used up. Repeat the process with the second dough ball. Sprinkle the uncooked cookies with a sea salt and lemon blend.
  4. Bake in a pre-heated oven for approximately 10-12 minutes, until the edges just begin to become golden. Remove from oven and place on a cooling rack. {Note: cookies will harden a little within minutes of cooling, so don’t overbake}. Allow the cookies to cool for 10 minutes and enjoy!

Recipe adapted from the Unconventional Baker

You can find this cute matcha bowl here and the fun Kate Spade cake plates here!

Cinnamon Toast Crunch Cupcakes with Cream Cheese Frosting (AKA the best cupcakes you will ever eat)

Guys. I made the most delicious cupcakes in the entire world and want everyone to make them and eat them and love them as much as I did.

Last winter, Sprinkles in Washington, DC offered different cereal-based cupcakes and I tried the Cinnamon Toast Crunch one and fell head over heels in love with it. Sadly, these were only weekly specials and were discontinued. So I looked up recipes online for an attempt to recreate the magic of these cupcakes and came upon a recipe that tasted even better. I made these for my boyfriend’s birthday in August and even though he always claims he “isn’t a dessert person” – a phrase that I will simply never understand – he ended up loving them too!

The recipe I used was adapted from here and I followed the recipe very closely. I don’t even mind that they aren’t entirely made from scratch (it requires boxed cake mix), but I’m sure you could improvise if you know a recipe for a standard cake you like to make!

One thing I was surprised about and had never considered was dipping the top of the cupcake (before frosted) into butter then cinnamon sugar. This was seriously a game changer and gives these cupcakes a churro-like taste as well. It can’t be beat!

ACS_0179

Ingredients for 24 Cupcakes

  • 1 box, French Vanilla Cake Mix
  • 1 small box (3.4 oz) vanilla instant pudding mix
  • 1 1/4 cups milk
  • 1/2 cup vegetable oil
  • 1/4 cup sour cream
  • 3 large eggs
  • 2 teaspoons ground cinnamon

Cinnamon Sugar Coating:

  • 4 tablespoons salted butter, melted
  • 1 cup granulated sugar
  • 1 tablespoon ground cinnamon

Cinnamon Cream Cheese Frosting:

  • 1 cup (2 sticks) salted butter, softened
  • 8 oz (1 block) cream cheese, softened
  • 2/3 cup heavy cream
  • 3 teaspoons vanilla extract
  • 6 cups powdered sugar
  • 2 cups Cinnamon Toast Crunch cereal, for garnish

Baking Instructions

  1. Preheat oven to 350 and line 24 muffin tins.
  2. In the bowl of your mixer, combine cake mix, pudding mix, milk, vegetable oil, sour cream, eggs, and cinnamon. Mix on low speed for 30 seconds. Scrape the sides of the bowl and increase mixer speed to high. Beat for 2 minutes.
  3. Stir a few times with a big wooden spoon, then fill prepared muffin cups 2/3 of the way full.
  4. Bake for 15 – 20 minutes, until tops spring back when lightly touched in the center. Remove from oven and let cool in the pans for 5 minutes before removing to wire rack to cool completely.
  5. In a small bowl, combine granulated sugar and ground cinnamon. In another bowl, add the 4 tablespoons of melted butter.
  6. Dip the top of a baked cupcake in the melted butter, then dip into the cinnamon sugar mixture. Repeat with remaining cupcakes. Set aside remaining cinnamon sugar for topping.
  7. For the icing, beat butter and cream cheese on medium speed until smooth and combined. Scrape the sides of the bowl. Add vanilla and heavy cream, beating on medium speed until smooth. With the mixer on low speed, slowly and carefully add powdered sugar until just barely combined. Increase mixer speed to high and beat for two minutes.
  8. Generously frost cupcakes. Top with a sprinkle of cinnamon sugar and stick cereal into frosting as you wish.
  9. Keep these cupcakes refrigerated if they are not served immediately.
  10. Enjoy these amazing cereal cupcake creations!

ACS_0180.jpg

Crema Catalana

Inspired by the Spain Box from Try the World, I made the Crema Catalana recipe from their online magazine with my own twist to it.

CC 4

The original recipe is below:

INGREDIENTS

  • 4 egg yolks
  • ¼ cup sugar
  • 2½ Tbsp. cornstarch
  • 2 cups plus 2 Tbsp. milk
  • Grated zest of ½ orange (or in my case honey!)
  • Pinch of salt
  • 4 Tbsp. P. Listo jam
  • 4 Tbsp. sugar

DIRECTIONS

1. In a small bowl using a hand held mixer, beat together the egg yolks and sugar until pale and creamy, about 5 minutes. In a separate, larger bowl, whisk together the cornstarch and 2 tablespoons milk until the cornstarch dissolves.

2. In a saucepan, combine the remaining 2 cups milk, orange zest, and salt. Heat over moderate heat, stirring constantly, until small bubbles form along the edge of the saucepan. Once the bubbles appear, lower the heat to keep warm.

3. Add the egg and sugar mixture to the cornstarch mixture and whisk until homogenous. Slowly pour in the warm milk, whisking constantly, until smooth and homogenous, then pour back into the saucepan. Heat the mixture over low heat, stirring constantly with a spoon, until it thickens, 10 to 12 minutes. Do not allow to boil.

4. Pour the mixture into 4 ramekins, then cover and chill in the refrigerator until firm, at least 3 hours.

6. Remove the ramekins from the fridge and spoon 1 tablespoon of the jam onto each custard. Sprinkle with the sugar, then broil until the tops are caramelized, about 5 minutes. Serve immediately.

Note that instead of using orange zest, I added about a tablespoon of an organic lavender honey that I have newly acquired and which is absolutely delectable.

I had never cooked with ramekins before, so I bought mine from Crate & Barrel (only $2.95 per dish!)  on the way home from work one day and am so excited to have them as a new addition to my kitchen!

I’m disappointed because I didn’t have a torch to really get the sugar bubbled and crispy, instead I broiled mine in the oven for a few minutes. They were still sweet and delicious though!

CC 3

CC 2

Enjoy ❤

Banana Pudding Pie with Caramel Drizzle

BP 4

Happy Monday! The warm June weather and humidity have started to settle in, and I have had the biggest craving for banana pudding. I looked up various Pinterest recipes and found one that I wanted to try! I varied it slightly to cut back on all the Cool Whip and decided to add a homemade caramel sauce to the recipe as well. If you’re craving the sweet comfort of a homemade banana pudding recipe, look no further!

Ingredients:

  • 1 9 pinch pie crust, prepped, baked and cooled (I was lame and just used a store bought graham cracker crust)
  • 2 cup chopped vanilla wafers
  • 2 bananas
  • 1/2 8oz tub Cool Whip
  • 1½ cups of milk
  • 1 5.1oz box instant vanilla pudding
  • juice from one lemon
  • Homemade caramel sauce for drizzling (recipe below)
  • Optional: chopped walnuts for topping

Directions for the Banana Pudding Pie:

  1. Cut the bananas into thin slices and then toss with the lemon juice. The lemon juice will prevent them from turning brown as fast as they normally would.
  2. Whisk together the milk and pudding mix. Mix in the cool whip. Mix in 1 cup of the crushed vanilla wafers and finally the bananas.
  3. Scrape into the cooled crust. Refrigerate for 10-15 minutes or until set.
  4. Top with any additional or leftover Cool Whip as you please. I just spread some around the edging of the pie. Sprinkle with the remaining vanilla wafers and then drizzle with the caramel sauce and if so desired, walnuts.

Directions for Homemade Caramel Sauce (taken from my Caramel Toffee Cheesecake Recipe)

  • 1/2 cups sugar
  • 2 tablespoons light corn syrup
  • 3 tablespoons butter
  • 1/3 cup heavy cream

In a medium sauce pan, combine the sugar and syrup. Cook on medium heat, stirring occasionally with a rubber spatula. Once it is caramel colored, add the butter and stir until the butter is melted. Add the cream and stir until it’s all combined. Bring it back to the heat if you get clumps and stir it until they’re dissolved. Store in the refrigerator if not using right away. Makes about 3/4 cup.

BP 2